Finally, I found out how to add those Follow buttons. I have been wondering for ages, and tried a few times without succeeding. I bumped into this blog post by Henry, and decided to give it a try again. I didn’t follow everything, but tried out some alternative ways to do it. This guide is for WordPress-users.

1. Find your icons: Henry suggests to look for social media icons on http://www.webdesignrazzi.com/2014/. However I ended up downloading zip files that didn’t contain individual icons that I look for. I started to google “individual social media icons”, and found some at carrieloves.com. What I like is that the icons are simple, and you can choose your own colour, and then you download the whole package. I used “Grayed Jade”. Once you’ve downloaded the zip-file, simply unzip it by right-clicking the file and extract:
And then a “normal” folder with the same name will appear in the same folder. I use the programme win.rar to unzip my stuff. So it might look a little different on your computer. You can unzip on all computers, even if you don’t have win.rar.
There is a myriad of icons out there, so you can literally keep looking until you find the perfect ones! I was satisfied with the ones I found on carrieloves.com.
2. Convert your icons from png. files to jpg- files because I found out that wordpress doesn’t accept png.files. You can simply do that by opening the file you wanna convert, in a picture editing programme, e.g. Paint. Press “Save As” and choose “JPEG” under “Save as type”.
Comment: actually, it’s possible to just click on the title and change “png” directly to “jpg” as long as you have checked the box in “Folder Options”–>”View”–>”Display the full path in the title bar”. It didn’t work on my computer. I don’t know why.
3. Add the icon images to your wordpress library: Look for “Media” at the menu, and choose “Add new”. Just drag and drop all your jpeg icons there.
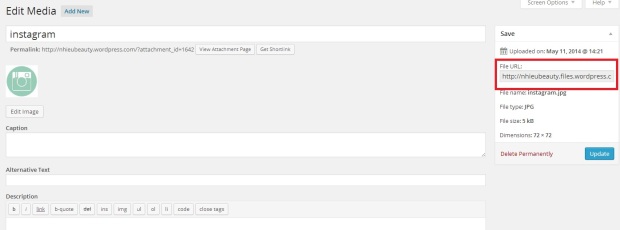
4. Save your image links: WordPress has then given all your icons a link which you have to note down (e.g. in a word-document). You find the link by clicking on “Edit”, and you’ll see the link at the right side. You need the link when you’re at step 6!
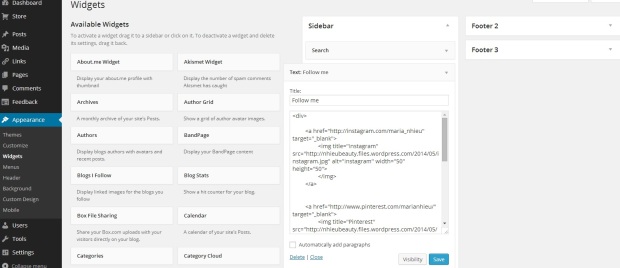
5. Decide where you want to put these icons: I wanted to put mine on the sidebar, so I clicked on “Appearance”–>”Widgets”, and then on the left side, you have a huge list of widgets. Choose “Text”, and drag it to the box called “Sidebar”. You can give it a title. I simply wrote “Follow me”
You can also include them in all your posts (like this one at the bottom). Just paste the html in your post. Remember to switch from “Visual” to “Text” when you paste the html.
6. Create the HTML: Just copy and paste the following html and adjust to your personalised url’s
<div>
<a href=”your personal social media link” target=”_blank”>
<img title=”The name of the social media site” src=”the img link you have saved in wordpress” alt=”The name of the social media site” width=”50″ height=”50″>
</img>
</a>
<a href=”your other personal social media link” target=”_blank”>
<img title=”The name of the social media site” src=”the other img link you have saved in wordpress” alt=”The name of the social media site” width=”50″ height=”50″>
</img>
</a>
</div>
Example: My html
7. Remember to click “Save“.
8. Go to your official wordpress site, and the icons should be there.
9. Icon size: Depending on how many icons you have, you can see what looks best. If you look at the <img>-tags in the html, you can see that I have set mine as 50 because I only have 4 icons. Just play around a little. Hit save, and refresh your page to see what size you prefer.
Additional comment: In Henry’s suggestion, there are a few things I have changed around. E.g. I am a little old school with the html-tags. I like proper close tags which I have added. Another thing – when people click on the icons, they will be taken directly to the social media sites, meaning that they will leave your wordpress page. I don’t like that, and prefer a new tab to open when they click on the buttons. That’s why I have added target=”_blank” in the <a>-tag.
I hope that this has helped some of you. I’m really excited to share this as I’d wish someone shared this with me earlier!
If you have any questions, please leave them in the comment section, and I’ll see if I can help you.
Happy Sunday!
Maria xoxo
Follow me:


