Review of Maybelline Master Graphic

On to my eyeliner number two of the three liners I purchased: Maybelline Master Graphic:

“Liquid marker eyeliner for a bold graphic look”

 maybelline master graphic pen

Application: I bought this liquid liner because of the unique marker pen-like tip. The tip is hard enough to make it easy to apply a line which also makes it more difficult to make a wing. When I was finished, it looked quite ok.

maybelline maste graphic look open IMmaybelline master graphic after closed

Pigmentation: When it comes to pigmentation, unfortunately, this thing is a disappointment for me. I had to go over this line several times to build up a solid line:


maybelline master graphic swatch

Longevity: It doesn’t claim to be waterproof or anything, and my eyes do water a lot. By the end of the day, my liners were gone 😦 At least, it didn’t smear or smudge. It just kind of disappeared. This might be good enough for those of you that can “keep a liner” on the eyes. This is me by the end of the day:

maybelline master graphic after

Removing the liner: As I didn’t have much left on my lids, I barely removed any of it. But I can imagine that it is very easy to remove.

Final verdict: Definitely not a liner that can last on my lids, and the pigmentation is just not good enough. I wouldn’t repurchase it. However, if you’re a beginner, this might actually be a good liquid liner to start off with even it looks a bit chunky and scary.

See my previous post on Maybelline Maybelline Master Ink Matte here.

The next liner I will review will be Maybelline Master Duo.

Until next time!

Maria xoxo

Review of Maybelline master ink matte

When the abstinence calls, it’s hard to hold back. I picked up a few Maybelline eye products as they were all 40% off. One of them was Maybelline master ink matte in 10 charcoal black as I thought it would be interesting to try out a matte liner.

Maybelline master ink matte product

Luckily I tried this at home. Because Anthony asked me out of the blue whether I have cried, and I was like “what?” and then I looked in the mirror and was shocked. My eyes didn’t really water since I put it on and it’s only a few hours at home.


Maybelline master ink matte look

To make it short: If your lids are just a little watery or oily, don’t risk getting this. The application was like a dream. It was easy to put on and I got beautiful lines with this product. It is not a waterproof eyeliner, but it still says “intense longwear eyeliner” on the bottle which I don’t think lives up to the claim.

Maybelline master ink matte swatch

Maria xoxo

Makeup for Christmas dinner

I went to a Christmas dinner with my colleagues 2 weekends ago. It was really fun to put on makeup on myself because I haven’t done that kind of makeup for a while, and also because I was putting on makeup for a few colleagues.

For my own look, I went for golden eyes and red lips. I used my Maybelline Color Tattoo in 75-24K Gold as base, and topped it off with “Strike” from the Urban Decay Vice2 palette. The lippie is Revlon Super Lustrous in 004 Retro Red.

Christmas dinner

Here are some close-ups. No filter.

2014-11-29 15.32.03_cropped  2014-11-29 15.32.13_cropped  2014-11-29 15.32.25_cropped  2014-11-29 15.32.29_cropped

So these are my beautiful colleagues that allowed me to put makeup on them. We did the makup in the bathroom which made it a little hard to capture the colours. Kristina (first row) got a dark green eye look, Marie (middle row) got a bordeux eye look, and Tine (3rd row) got a purple eye look (although it’s a little hard to tell from the pictures). I used some nyx singles, Maybelline Color Tattoos (Promegranate Punk and Painted Purple) as bases for Kristina and Tine, and the MUA makeup palette in Undressed.

PicsArt_1417365084094


Okay, one more selfie:

2014-11-29 15.31.53

I need more occasions to do this kind of festive looks!!

Maria xoxo

When to chuck out your mascaras

Time flies by. I haven’t been blogging for months. An update post will hopefully be coming up soon! I have been burning up with topics and products I want to share with you but simply haven’t had the time.

Today, we are going to talk about mascaras. I have never believed in buying expensive mascaras, as I find the cheap ones are working just fine. I especially love Maybelline’s mascaras. My favourite is The Falsies, and I have been using The Rocket Volum Express every day lately. I mean, they have been lasting me for a long while – too long maybe. I keep using them, thinking that they will dry out soon, but nope, they are still good to use – or are they?

The rule of thumb with mascaras is: You have to chuck them out after 3 months! I don’t remember where I read it, but after 3 months, small crawlies will begin to grow, and it’s really not nice to put that not-so-clean mascara wand so close to your eyes. That’s also why it’s not a good idea to have too many mascaras in use at the same time.

I just opened my Maybelline the Hyper Curl Volum Express. It looks really natural, but still gives my lashes some volume. I get a kind of flaring effect opposed to the more clumpy Rocket – though I really get some serious volume with it. I’m not too sure about the staying power of Hyper Curl yet (I use the waterproof one). I might do a review of it later.

It’s heartbreaking, but I’m letting go. Goodbye, my beloved Falsies, Rocket, and Urban Decay Cannonball…

How long do you hold on to your mascaras?

Maria xoxo

Those follow buttons

Finally, I found out how to add those Follow buttons. I have been wondering for ages, and tried a few times without succeeding. I bumped into this blog post by Henry, and decided to give it a try again. I didn’t follow everything, but tried out some alternative ways to do it. This guide is for WordPress-users.

follow me buttons

1. Find your icons: Henry suggests to look for social media icons on http://www.webdesignrazzi.com/2014/. However I ended up downloading zip files that didn’t contain individual icons that I look for. I started to google “individual social media icons”, and found some at carrieloves.com. What I like is that the icons are simple, and you can choose your own colour, and then you download the whole package. I used “Grayed Jade”. Once you’ve downloaded the zip-file, simply unzip it by right-clicking the file and extract:

unzip

And then a “normal” folder with the same name will appear in the same folder. I use the programme win.rar to unzip my stuff. So it might look a little different on your computer. You can unzip on all computers, even if you don’t have win.rar.

There is a myriad of icons out there, so you can literally keep looking until you find the perfect ones! I was satisfied with the ones I found on carrieloves.com.

2. Convert your icons from png. files to jpg- files because I found out that wordpress doesn’t accept png.files. You can simply do that by opening the file you wanna convert, in a picture editing programme, e.g. Paint. Press “Save As” and choose “JPEG” under “Save as type”.

save as

Comment: actually, it’s possible to just click on the title and change “png” directly to “jpg” as long as you have checked the box in “Folder Options”–>”View”–>”Display the full path in the title bar”. It didn’t work on my computer. I don’t know why.

3. Add the icon images to your wordpress library: Look for “Media” at the menu, and choose “Add new”. Just drag and drop all your jpeg icons there.

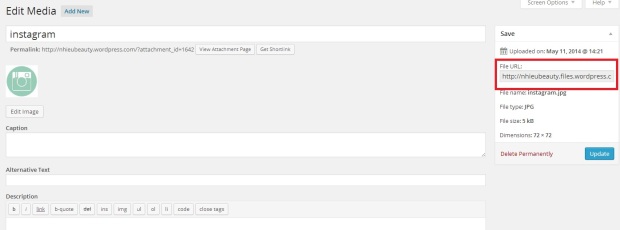
4. Save your image links: WordPress has then given all your icons a link which you have to note down (e.g. in a word-document). You find the link by clicking on “Edit”, and you’ll see the link at the right side. You need the link when you’re at step 6!

wordpress url

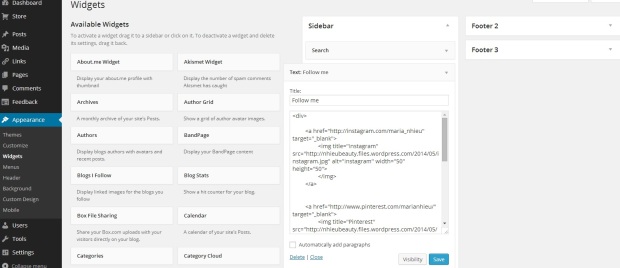
5. Decide where you want to put these icons: I wanted to put mine on the sidebar, so I clicked on “Appearance”–>”Widgets”, and then on the left side, you have a huge list of widgets. Choose “Text”, and drag it to the box called “Sidebar”. You can give it a title. I simply wrote “Follow me”

html

You can also include them in all your posts (like this one at the bottom). Just paste the html in your post. Remember to switch from “Visual” to “Text” when you paste the html.

6. Create the HTML: Just copy and paste the following html and adjust to your personalised url’s

<div>
<a href=”your personal social media link” target=”_blank”>
<img title=”The name of the social media site” src=”the img link you have saved in wordpress” alt=”The name of the social media site” width=”50″ height=”50″>
</img>
</a>

<a href=”your other personal social media link” target=”_blank”>
<img title=”The name of the social media site” src=”the other img link you have saved in wordpress” alt=”The name of the social media site” width=”50″ height=”50″>
</img>
</a>
</div>

Example: My html

my html

7. Remember to click “Save“.

8. Go to your official wordpress site, and the icons should be there.

9. Icon size: Depending on how many icons you have, you can see what looks best. If you look at the <img>-tags in the html, you can see that I have set mine as 50 because I only have 4 icons. Just play around a little. Hit save, and refresh your page to see what size you prefer.

Additional comment: In Henry’s suggestion, there are a few things I have changed around. E.g. I am a little old school with the html-tags. I like proper close tags which I have added. Another thing – when people click on the icons, they will be taken directly to the social media sites, meaning that they will leave your wordpress page. I don’t like that, and prefer a new tab to open when they click on the buttons. That’s why I have added target=”_blank” in the <a>-tag.

I hope that this has helped some of you. I’m really excited to share this as I’d wish someone shared this with me earlier!

If you have any questions, please leave them in the comment section, and I’ll see if I can help you.

Happy Sunday!

Maria xoxo

Follow me:

100 Happy days: Day 1

I am very excited to announce that I will be doing the 100 Happy Days challenge! The idea is simple – post 1 picture every day where you capture something or someone that makes you happy. And just do it for 100 days!

Here is my Day 1 capture:

2014-05-06 18.20.05

The sun is shining. The sky is blue. I’m not wearing a jacket. Happy Day 1 of 100 happy days. #100happydays #nofilter

I have seen this tag going wild for a while, but I didn’t really think about doing it myself. Lately, I have been thinking a lot about what makes me happy. I have to learn to appreciate and be happy for what I have – as a quote I saw the other day says: “Happiness is not getting what you want, but appreciating what you have”.

I will be uploading the pictures on my Instagram. So if you want to follow my 100 happy days, follow @maria_nhieu

That’s it for now. Will see if I can find some time to blog about something more beauty related.

Have a great weekend.

Maria xoxo


L’Oreal True Match Foundation review

I used the L’Oreal’s True match foundation like 10 odd years ago, and I’ve recently purchased it. I remember that I stopped using it because in the end of the day, I never had any foundation left on my face. But that’s defo not the case any more with the new formula.

IMG_6327

Texture and finish

After all those years, of course, they have changed the formula…. to the better… Oh my…. When I applied it for the first time, I was overwhelmed by how soft and blendable it is. I only need one pump to cover my whole face (and a little left for the areas that need a little extra), and I just use my fingers to apply. Usually, I always powder my face, but I haven’t done it with this one. The True Match leaves a semi-matte finish meaning that it would be good for oily/oily-combination skin. So be careful if you have dry skin!

Wearing the L’Oreal True Match foundation in shade N6 on the right side of my face. Excuse me for the horrible brows!

Coverage

I would say that it’s gives a medium coverage. It looks very light on my face because I applied a very thin layer. Why cover everything up now that my acne scars are fading? You can easily build it up. I dab on more around my nose, under my eyes, and the cheek area where I have many blemishes. It works really well, especially when you don’t have a whole lot of time in the morning to fumble around with concealers and all that.

Shades

IMG_6328

As you probably know, the True Match line has a myriad of shades! But bare in mind that as soon as you’re outside of the States, there are usually only a few to choose from. I ended up with the N6. I’d wish I could have chosen the W6 though. “N” stands for neutral and “W” for warm. I have yellow-toned skin, so I usually go for the “W”‘s.

It sounds funny, but when I apply the N6 to my face, it doesn’t look quite yellow enough. But when I put it on my hand, it seems very yellow.

I haven’t been at the MAC counter to check my shade for a long time, but I think I’m down to an NC 35 or 37 – just for comparison.

Summary

I love it! It feels super nice and light on the skin. I only spend a few secs to apply it with my fingers, and the coverage is really good. I want to try out the W6 to see whether that one would be too yellow for me though.

As for the price, I bought it on sale for around 11€. I would say that this foundation is super affordable, and totally worth the price!

Have you tried this foundation before? Which shade do you use and what MAC shade are you?

Maria xoxo


I was at my brows…

Referring to my last post and the brows I wasn’t too satisfied with… well… my bf thought he wanted to fix it. So here we go…

2014-04-20 18.35.59

So I thought I would repay his kind offer, and I fixed his eyebrows as well…..

IMG-20140420-WA0067

What do you girls think? Which one of us did a better job?

FYI… Products used: Rimmel eyebrow pencil in dark brown on me, and the same on Anthony plus the Milani Tint Pen in dark brown.

Happy Easter everyone 🙂

Maria xoxo